Getting Started With Datanamic DataDiff
Datanamic DataDiff is a tool that can compare and synchronize data between any selected pair of matched tables. You can use Datanamic DataDiff to compare and synchronize data in Oracle, MySQL, MS SQL Server, InterBase, Firebird and PostgreSQL databases. This article demonstrates a basic comparison and synchronization of data in two databases.Starting Datanamic DataDiff and Connecting to the Databases
When you start Datanamic DataDiff the Welcome dialog opens and you can choose to start a new project or reopen an existing project. Choose New Datanamic DataDiff project to start the new project wizard.In the first step you are prompted for the connection parameters of the source database. The source database is used as the reference database for the comparison and synchronization and will not be changed. Depending on the database type (Oracle, MySQL, MS SQL, PostgreSQL, InterBase, FireBird, etc) different connection parameters such as server name, host, user name etc may be required.
If your database supports schemas (or owners), a schema/owner parameter will be available. If you leave this empty, all tables from all schemas will be retrieved from the database. If you provide a schema/owner name, only the tables of that schema will be retrieved.
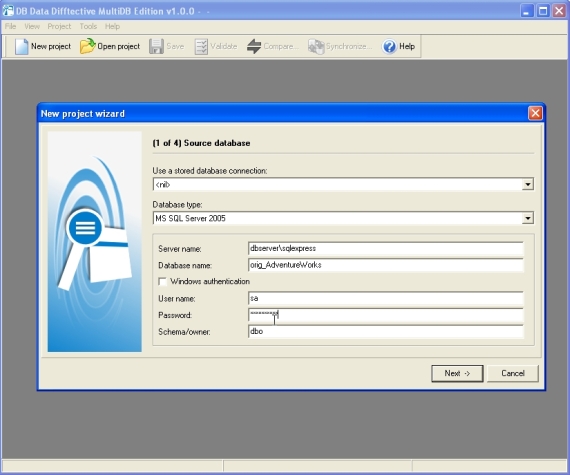 |
After entering the connection parameters press the Next button.
You are prompted for the connection parameters of the destination database. Synchronization will change the data in the destination database when you choose to synchronize the data in the source and destination database. Enter the connection parameters in the same way as you did for the source database. Press Next to continue.
Datanamic DataDiff will now connect to the source and destination database to retrieve a list of tables. You now have to select the tables you want to add to your project. In the next step you must link the selected tables to the matching table in the destination database. Datanamic DataDiff initially links tables in the source and destination database based on the name of the table. If you want to compare a table in the source database with a table with a different name in the destination database then you can select that table from the dropdown list in the second column of the list.
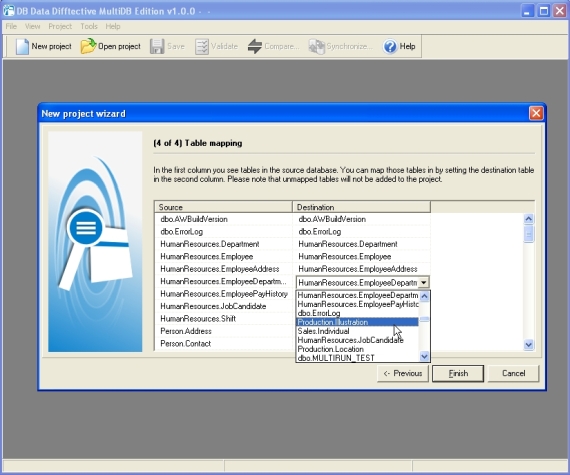 |
Please note that you can edit the list of tables (add, remove or map) also for an existing project outside of the New project wizard.
Press Finish to close the wizard. You are now ready to compare the tables in your project.
Changing Table Settings
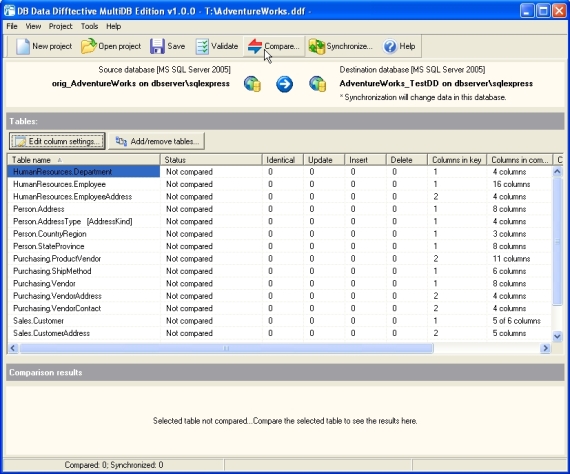
The main window contains a list of tables added to the project. Datanamic DataDiff usually provides some reasonable default settings for the comparison, so you don't have to change anything after adding tables to your project. There is one exception. If your tables do not have a primary key then you must specify a comparison key.
 |
To be able to match rows in the source and destination table, Datanamic DataDiff needs a comparison key for each table. Datanamic DataDiff automatically selects a comparison key, if your tables contain a matching primary key or index. If no suitable comparison key is found then the column Columns in key in the list on the main window lists 0. You can set the comparison key in the Edit column settings dialog.
To set the comparison key of a table, select the table in the list of tables and press the Edit column settings button. In the list of mapped columns you must tick the comparison key checkbox to add a column to the comparison key.
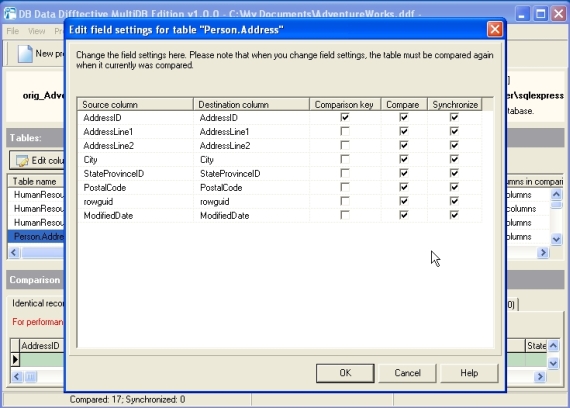 |
The Edit column settings dialog is also the place to map columns in the source and destination table and to change the columns to compare and/or synchronize.
Starting the Comparison
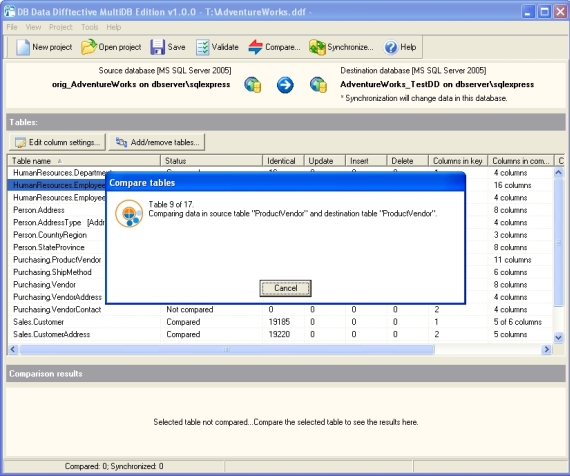
To start the comparison select Project | Compare (shortcut F8) or press the Compare button. The Select tables to compare dialog opens where you can select the tables you want to compare (By default all tables are selected). Press OK to start comparing the data in the tables.Depending on the number of tables and records this may take a while. Datanamic DataDiff will display a dialog indicating the progress.
 |
Reviewing the Data Comparison Results
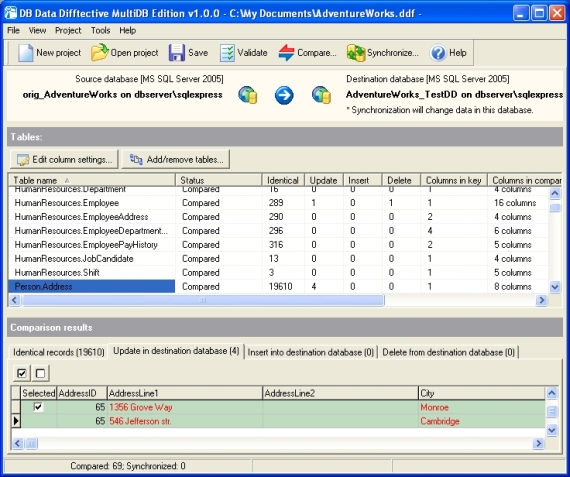
When you have compared the data in the tables, Datanamic DataDiff displays the comparison results in the main window. You can see the comparison results for each compared table in the list of tables, showing the number of identical records, records to be updated, records to be inserted and records to be deleted.If you select a table, you will see the complete contents of the records below in the Comparison results pane. For records with differences, the fields containing differences are colored red.
 |
Synchronizing Data
After reviewing the comparison results we can start synchronizing the tables. Note that only data in the destination database will change.To synchronize the compared tables, select Project | Synchronize (shortcut F9) or press the Synchronize button. The Select tables to synchronize dialog opens where you can select the tables you want to synchronize (By default all compared tables are selected).
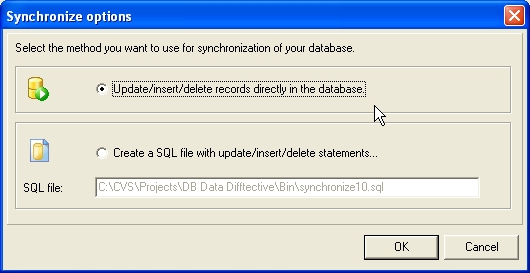
After selecting the tables you want to synchronize, you must select how to synchronize. You have got two options: let Datanamic DataDiff connect to the destination database and insert, update and delete records in the database or let Datanamic DataDiff generate a SQL script with the insert, update and delete statements.
 |
After choosing how to synchronize the synchronization starts. Datanamic DataDiff will display a dialog indicating the progress.
When you have synchronized the tables, Datanamic DataDiff will change the status of the tables in your project to synchronized.
Reusing the Project
If you need to synchronize the data in the same data sources more often you can reuse the project. The connection parameters, tables added to the project, mapping information and column settings are saved in the project file. The comparison results on record level are not saved.
Resources
Learn- Datanamic DataDiff: Learn more about Datanamic DataDiff.
- Check out Datanamic DataDiff's companion product Datanamic SchemaDiff for comparing and synchronizing database schemas.
- Synchronize data in databases with Datanamic DataDiff trial software, available for download directly from Datanamic's download section.